Cocoa butter is the fat extracted from cocoa beans. Although it’s butter, it is purely vegan; free from animal products, honey, dairy and eggs, making it suitable for vegetarians.
But cocoa butter has other uses too, like treating various skin care conditions. As such it is used in most skin care products in the cosmetic industry.
The good news is; you can make your own cocoa butter at home for your skincare needs!
In this article, I’ll share information about what cocoa butter is, types of cocoa butter and how to make cocoa butter at home.
Also Read: Everything You Need to Know About Cocoa Butter!
How to Make Cocoa Butter: Quick Tips
Cocoa butter is a natural, edible fat that is extracted from the cocoa bean. It has a smooth texture and a subtle chocolate flavor. Cocoa butter is popular in cosmetics and skincare products because it is hydrating and helps to protect the skin from the sun.
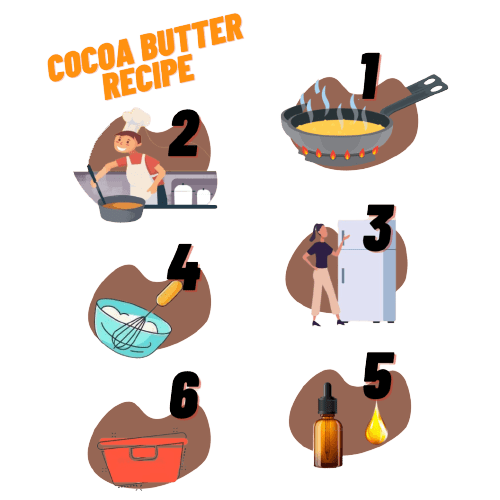
- Weight your cocoa butter and melt it in a double boiler
- Allow the butter to melt fully, stirring from time to time
- Pour the mixture into a heat resistant bowl and place it in the refrigerator
- Keep in freezer for 20-30 minutes until it becomes semi-solid
- Remove the butter from the freezer
- Whip the semi-solid mixture with a hand mixer for about 10 minutes
- Whip until it turns whitish fluffy
- Add desired oils
- Pour the mixer into an airtight container or glass jar
Your cocoa butter is ready to use!
Quick Step-by-step Guide on How to Make Cocoa Butter
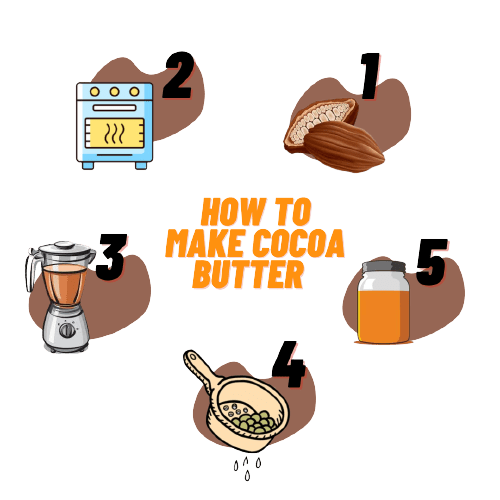
Step 1: Gather your supplies. You will need cocoa beans, a food processor, a strainer, and a jar or container to store your cocoa butter in.
Step 2: Roast the cocoa beans. Spread the beans out on a baking sheet and roast them in the oven for about 15 minutes. Be careful not to let them burn!
Step 3: Remove the shells from the roasted beans. Place the roasted beans in the food processor and blend them into a fine powder.
Step 4: Strain the cocoa butter. You can use a strainer, cheesecloth, or coffee filter to strain out any remaining shells from the cocoa butter.
Step 5: Store as you would any other type of butter. Store in a jar or container, keep it in the fridge and apply to your skin as often as you like.
Also Read: Does Chocolate Come From Cocoa Beans? A Complete Guide!
Types of Cocoa Butter

1. Raw Cocoa butter
The unrefined cocoa butter, also known as the raw cocoa is creamy yellowish. It comes with all its natural skincare and health components. It is cocoa butter that is not heated at higher temperatures during processing stages, thereby maintaining its nutrients and saturated fatty acids.
Raw cocoa butter is superlative for extra-sensitive skin like those that develop bumps or keloids, and dry skin affected by eczema. Its raw state also makes it ideal for medicinal purposes as it prevents inflammation of the skin and aids the overall health of the skin.
2. Refined cocoa butter
Refined cocoa butter results in whitish color with most of the ingredients gone. Refine cocoa butter also takes away its chocolate smell, making it unique for skincare manufacturers that want to use it in their cosmetic products without the smell.
3. Ultra-refined cocoa butter
Ultra-refined, also known to be deodorized, seems to have properties in-between both raw and refined cocoa butter.
Having a whitish bright color, it loses its chocolate smell like refined cocoa butter but still maintains most ingredients found in raw cocoa butter.
Ultra-refined cocoa butter is stable and emollient, and can be added to products that do not need the chocolate smell; blending well with floral-scented cosmetics.
As an ideal ointment base, it improves skin elasticity, prevents dehydration and restores skin to its health during peeling. It is also a superlative ingredient in natural lotions, creams, lip balms, bar soaps, hair conditioners, and body butter.
4.Cocoa Organic Butter
This type of cocoa butter is best used in organic cosmetics and shampoos. It is known to be processed and refined to produce a whitish, odorless butter used as a skin moisturizer. Organic cocoa butter is solid at room temperature but melts readily on contact with the skin.
What is cocoa butter?
Cocoa butter, also known as Theobroma Cacao is native to Central and South Americans before spreading to Europe and West Africa, recounted by the World Cocoa Foundation.
When extracted cocoa butter is solid at room temperature. To obtain a liquid cocoa butter, you need to heat indirectly from fire at 35-37 degrees Celsius, thus placing a second saucepan on the main saucepan that’s on the cooker.
Cocoa butter is expensive due to its extended shelf life of about five years. In some cases, because it is oiler and comedogenic, the use of cocoa butter may not be favorable for those with oily skin, especially on the face since cocoa butter tends to clog your skin pores. Hence, it is not a good choice to be used in the face of people who suffer from acne.
However, cocoa butter serves, also, as a moisturizer for dry hair, working on African hair strands to make them easy to comb.
Also Read: What is Cocoa Butter: Benefits, Uses, Characteristics and Side Effects
How cocoa butter is extracted
Cocoa beans are harvested once a year after the pod has matured and dried. The cocoa bean is then fermented and dried to remove the husks (the outer layer of the bean) before it is pulverized into a paste. Cocoa butter can also be extracted from the cocoa bean by mechanical means. This process is called solvent extraction and is used to remove any non-cocoa fats that may have been present in the beans.
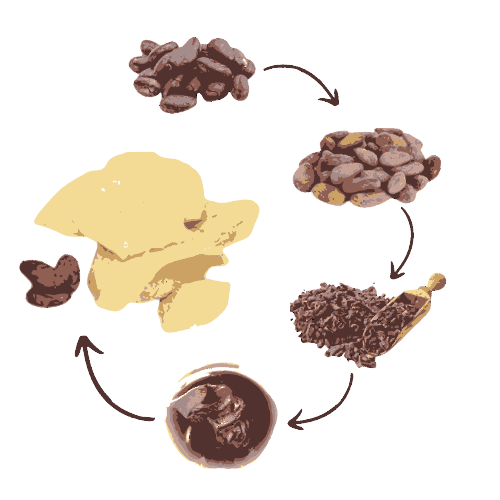
1. Extracting cocoa beans from the pods
According to Fanny C et al, to extract cocoa butter, the pods are first harvested at maturity. The amount of cocoa beans harvested depends on the amount of cocoa butter that needs to be extracted.
Then the pods are opened to remove the beans carefully, placing them in a basket. The husks of cocoa are a good source of compost for plants. It is advisable not to wait more than four days before opening the pods.
2. Fermenting the cocoa beans
When the cocoa beans are opened, it is time to ferment them. Mostly, the fermentation of cocoa beans is done using wooden boxes that have holes at the bottom. The beans are placed in the wooden boxes placed above floor level to keep the beans warm.
Because the beans are fresh, as they ferment, juices drip to the bottom and may cause the beans to rot. This is why it is important to make holes at the bottom of the wooden box so that the drips can flow out of the box.
Nevertheless, some farmers prefer to heap the cocoa beans on a dry flat surface, covering it with banana leaves and turning it a few times a week to ferment. The disadvantage of this process is that the drip of the fermenting cocoa beans stays in the heap and may result in rot.
The best method to use in fermenting cocoa beans, therefore, is the wooden box, however, you need to change the boxes every two days after stirring the cocoa beans.
Now cocoa beans go through a fermentation procedure because cocoa beans contain a seed coat, a germ and a kernel. The fermentation process destroys the seed coat, germ and gives the kernel a good taste.
3. Drying the cocoa beans
The cocoa beans ought to be dried after the fermentation process. There are two ways to dry cocoa beans; through the scorching sun or by roasting using fire.
To dry fermented cocoa beans in the sun, spread them on large boards or flat surfaces raised one meter above ground level. Keep the layer of cocoa beans as thin as possible, less than four centimeters thick.
Keep watch, stirring the beans often so the bottom can expose you to the sun too. This may take between five to ten days to dry.
To dry the fermented beans through fire, spread the cocoa beans on a concrete slab and place them above the modern drier. The modern dryer is built with a hollow space beneath it.
Light fire underneath the modern drier to heat the concrete slab. The fire should not be too hot as to burn the cocoa beans. Make sure you stir often to achieve balance or even.
The modern drier method is mostly used in cocoa-growing regions where the weather is often moist and as such, using the sun method does not dry the cocoa beans well.
Drying cocoa beans makes it less moist which ensures the purest extraction of cocoa butter.
4. Sorting the dried cocoa beans
After drying the cocoa beans, they need to be sorted by separating the broken beans, the flat beans, the germinated beans and moldy beans.
This process is necessary to keep only good dried cocoa beans.
5. Grinding the cocoa beans
Dried cocoa beans are then finely ground, pressed so cocoa butter can be obtained. There are also two methods used in grinding cocoa beans for cocoa butter.
One method is through warming the ground cocoa beans to be able to press them warm. This method is easier although it does not obtain raw cocoa butter.
Contrariwise, you can cold press the dried cocoa beans to obtain cocoa butter. This cocoa butter is raw cocoa butter with all the ingredients intact.
Cold pressing cocoa beans can either be done by pressing the whole cocoa beans to extract cocoa butter or by grinding the cocoa beans to a pulp then pressing the pulp to extract the butter.
Whatever cold pressing method you use results in the same purest quality of cocoa butter extracted, however, grinding guarantees maximum removal of cocoa butter.
It is notable that extraction of cocoa butter methods is mostly used in the factory but can be done at home if you have the right equipment and tools. Moreover, you can always get raw cocoa butter to make homemade cocoa butter for your skincare.
How to make cocoa butter moisturizer at home with coconut oil and essential oils- Step by step guide
Making your own cocoa butter at home for skincare uses is simple. Below is the step-by-step guide.
Equipment needed
- Two saucepan or double boiler
- Whisk
- Aluminum bowl
- Tight empty jar with lid
Ingredients needed
- ¾ Cup of raw cocoa butter
- ¼ cup of coconut oil
- 10 drops of essential oil of your choice (we’ll use lavender oil in this example)
Instructions or guidelines
- Add your cocoa butter and coconut oil together and heat indirectly until it melts
- Once it melts, take it off the fire and pour it into the aluminum bowl
- Put in the fridge and cover to prevent water from dripping in.
- Take out of the fridge after 15 minutes. You’ll need to adjust the timing if the liquid is not semi-hardened by then.
- Once out of the fridge, Whisk the mixture for 5 minutes
- It turns whitish fluffy
- Add ten drops of lavender oil
- Whisk the mixture again for 1-2 minutes
- Poor the cocoa butter in your glass jar and cover tightly
- Use within three months.
Hurray! Now you have highly moisturized homemade cocoa butter.
Frequently asked questions;
Q: How long can I keep my homemade cocoa butter?
A: When stored away from wetness and light, your homemade skincare cocoa butter should last between six to eight months. Using a spoon or spatula to dip rather than your fingers will extend the life of the cocoa butter.
Q: Can I add essential oils to my homemade cocoa butter?
A: Yes, you can add an essential oil like lavender oil, olive oil, argan oil, or other choice oils to cocoa butter to tone down the chocolate aroma.
Q: Does cocoa butter darken skin?
A: No, however, it can protect the surface layer of skin from outside agents that can damage and darken the skin. Moreover, while cocoa butter might help reduce the appearance of darkened spots over time, it is not a major skin lightening substance.
Q: Can I use my homemade cocoa butter on my face?
A: Yes, you can apply cocoa butter to your face if you have dry skin. Using cocoa butter might improve the overall health and appearance of the skin on your face. However, if you suffer from acne, it would be best to avoid cocoa butter on your face.
Concluding thoughts
Cocoa butter for skincare needs can be prepared at home. To extract raw cocoa butter from dried cocoa beans, you’ll need the right equipment and tools.
Follow the guidelines above for perfect homemade cocoa butter. Remember you have a choice to use other ingredients too like shea butter in place of coconut oil and argan oil in place of lavender oil.
Also Read: Cocoa Butter vs Shea Butter: Which Is Better for Your Skin?
Reference:
- Bindu Naik, V. K. (2014). Cocoa Butter and Its Alternatives: A Review. JOURNAL OF BIORESOURCE ENGINEERING AND TECHNOLOGY.
- ChemistDirect. (2022). Palmers. ChemistDirect.
- Cocoa Butter and Cocoa Butter Equivalents. (2001). In K. W. Smith, Structured and Modified Lipids (p. 14).
- Connery, T. (2018). The Amazing Cocoa Butter – 6 Reasons to Make It Part of Your Health & Beauty Regimen! Wild Mountain Chocolate.
- Dand, R. (2011). The International Cocoa Trade (Third Edition). In Cocoa Butter; an Overview.
- Fanny C. Padilla, R. L. (2000). Characterization of cocoa butter extracted from hybrid cultivars of Theobroma cacao L. SCIELO.
- Forbes, J. (2022). Why Palmer’s Cocoa Butter Has Been My Favorite Moisturizer for Almost 30 Years. Allure.
- Kumar, D. S. (n.d.). Palmer’s Cocoa Butter Formula Body Gloss Cream Side effects. Generic Drugs.
- Minifie, B. (2012). Cocoa Butter and Replacement Fats. In B. Minifie, Chocolate Cocoa and Confectionery Science (pp. 85-111). Netherlands: Springer Netherlands.
- Montes, S. (2022). Palmer’s Cocoa Butter Is a Hydrating Hero for Dry Skin. Byrdie.
- New Directions Aromatics. (2017). BEAUTIFYING BENEFITS OF NATURAL COCOA BUTTER. New Directions Aromatics.
- Palmers.com. (2022). Palmers Collections. Palmers.
- Stalder, E. (2018). Cocoa Butter Is The Powerful Skin-Care Ingredient You’ve Been Underestimating. Refinery 29.